The Original Problem
I only had one 4gb flash drive (really 3.83GB approx) available and needed to install a fresh Windows image on a PC I'd purchased from a friend.
The Solution (The Real Problem)
A heavily stripped down version of Windows 10 IoT Enterprise LTSC 2021 was found at size of 3.2GBs or so, allowing me to install Windows using only the 4GB drive. Over time, understandably, I came to realize many core components were broken or missing entirely. Hyper-V & WSL could not be installed due to the system version, and dependencies were not installable due to corruption of various pieces of the OS.
No combination of OS recovery/restoration tools such as those below were able to successfully mend the OS, not even from a WinRE environment, most would simply freeze soon after execution.
sfc /scannow
Dism /Online /Cleanup-Image /ScanHealth
Dism /Online /Cleanup-Image /RestoreHealth
Repair-WindowsImage -Online -ScanHealth
Repair-WindowsImage -Online -RestoreHealth -Source "install.wim path:<Index Number of OS type>"
At this point I decided to install Windows 11 on a secondary drive and dual boot. This allowed me access to a full-functional Windows operating system, however I prefer Windows 10, have software reliant on it, and a large number of configurations already built around it. To better utilize both Windows 10 and Windows 11 OS systems within my workflow I began the process of configuring raw disk access through VirtualBox, allowing me to access my Win11 system directly from within Win10, and only dual boot into Windows 11 (GPU usage almost solely) when absolutely required.
Here's the process via Oracle VM VirtualBox (the only hypervisor that functions correctly on my busted Win10 image) - similar functionality is available through Hyper-V and VMware Workstation.
-
- [ ] Determine which physical drive contains your Windows 11 OS
-
- [ ] Create a VMDK (Virtual Machine Disk) file
-
- [ ] Create a new VM utilizing the previously created virtual hard disk file
-
- [ ] Configure VirtualBox to boot properly from EFI
Determine which physical drive contains your Windows 11 OS
- Open an administrative CMD Prompt window
- Run
diskpart - Once inside the diskpart tool enter
list diskto get a list of detected disks, their disk number/value, sizes and statuses - Determine which disk holds your Windows 11 OS using
select disk Xi.e.select disk 1and validate each disk usingdetail diskuntil you've confirmed the correct drive, finally note it's drive number - Verify write protection is not enabled via
attributes diskwhile the disk is still selected in diskpart- If it is enabled, disable it with the following
attributes disk clear readonly
- If it is enabled, disable it with the following
- Run
-
- [x] Determine which physical drive contains your Windows 11 OS
-
- [ ] Create a VMDK (Virtual Machine Disk) file
-
- [ ] Create a new VM utilizing the previously created virtual hard disk file
-
- [ ] Configure VirtualBox to boot properly from EFI and configure optimally for usage
Create a VMDK (Virtual Machine Disk) file
- If you don't Virtualbox's CLI tools added to PATH, navigate to C:\Program Files\Oracle\VirtualBox or whichever directory you installed it in
- Run the following command
./VBoxManage createmedium disk --filename "C:\Users\Username\Desktop\win11.vmdk" --format VMDK --variant RawDisk --property RawDrive=\\.\PhysicalDrive1be sure to update the path in the command to the correct location of your choosing and modify PhysicalDrive with the value noted from the previous step, for myself it was 1. - Validate the file exist using the following command or do so manually
if exist "C:\Users\Myles\Desktop\win11.vmdk" (echo File found) else (echo File not found)
-
- [x] Determine which physical drive contains your Windows 11 OS
-
- [x] Create a VMDK (Virtual Machine Disk) file
-
- [ ] Create a new VM utilizing the previously created virtual hard disk file
-
- [ ] Configure VirtualBox to boot properly from EFI
Create a new VM utilizing the previously created virtual hard disk file
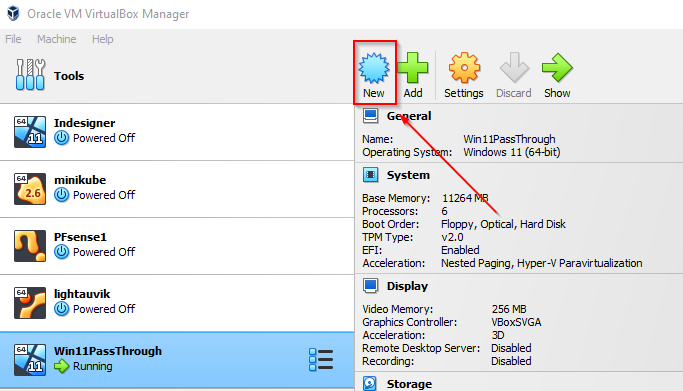
- Open Oracle VM VirtualBox Manager as an Administration and click New
- This is an important step, as otherwise it will not have the access required to interface with the VMDK
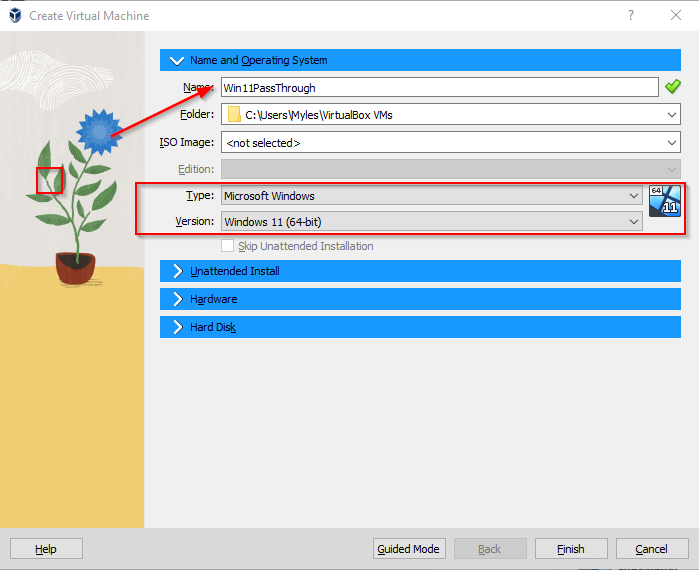
- Name your VM and ensure the correct type and version are selected
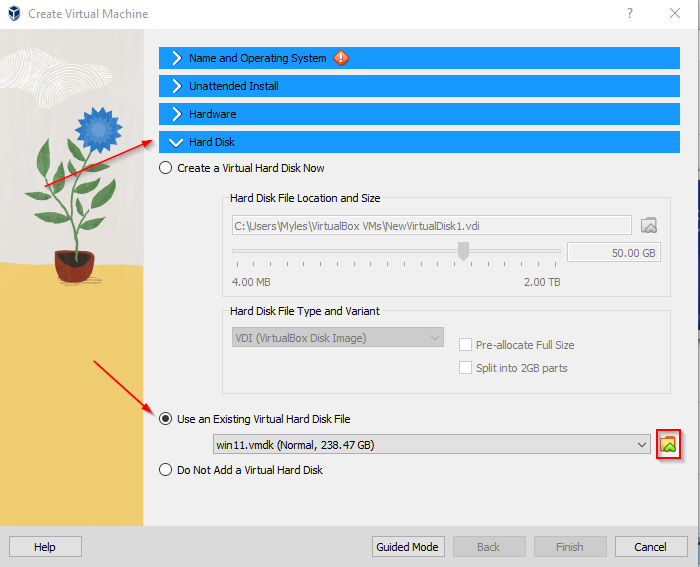
- Select Hard Disk from the tabs at the top of the menu
- Select Use an Existing Virtual Hard Disk File
- If yours is not visible from the dropdown, select the folder icon on the right, click add and navigate to the location of the file, select it and click Finish
-
- [x] Determine which physical drive contains your Windows 11 OS
-
- [x] Create a VMDK (Virtual Machine Disk) file
-
- [x] Create a new VM utilizing the previously created virtual hard disk file
-
- [ ] Configure VirtualBox to boot properly from EFI
Configure VirtualBox to boot properly from EFI
- Select your VM and click Settings -> System -> Extended Features and ensure Enable EFI (special OSes only is selected, lastly click Ok.
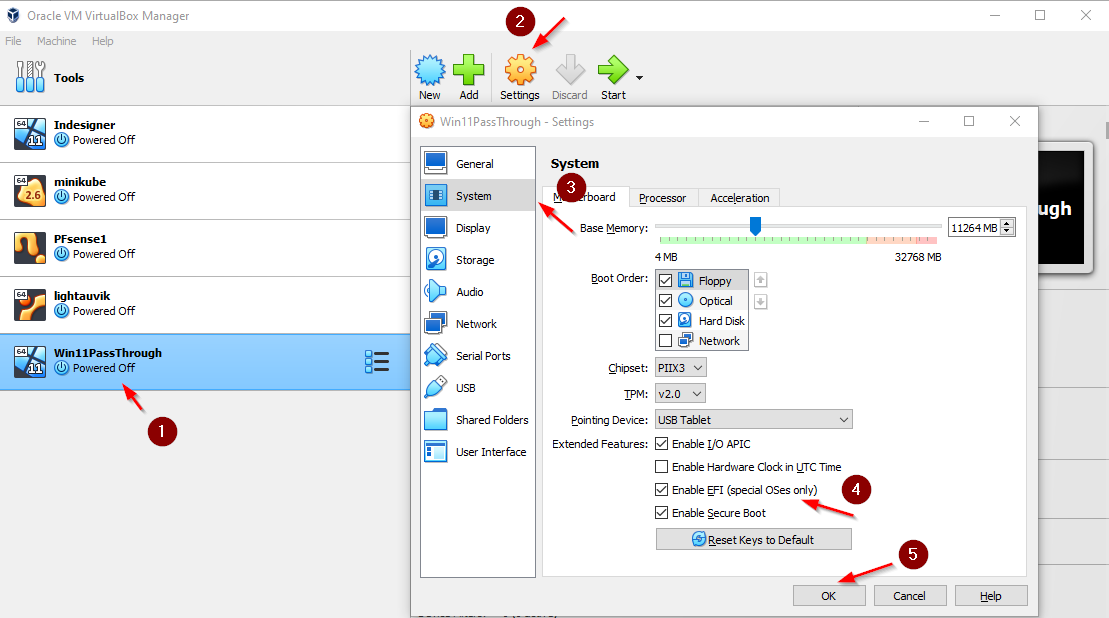
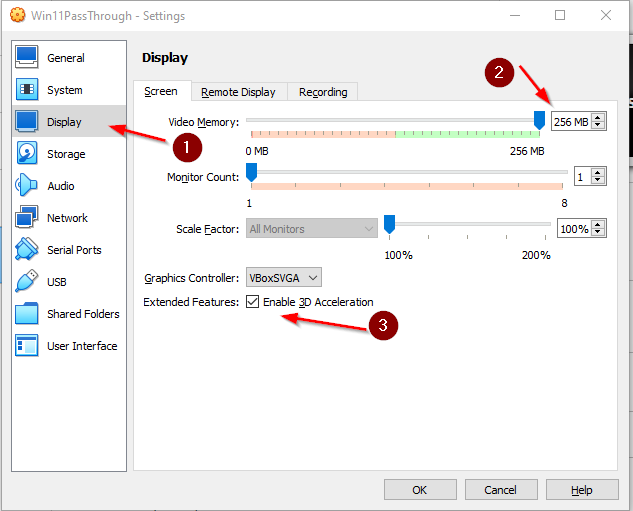
- For optimization purposes I suggest enabling 3D Acceleration and increasing Video Memory to 256MB (max) then enabling Guest Additions within the virtualized Win 11 system
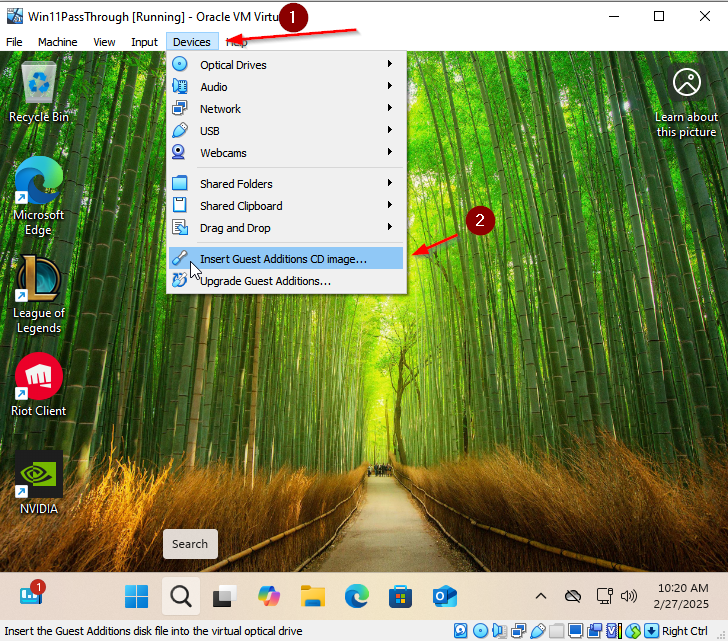 Once the guest additions disk has been "inserted", run the appropriate installed from Windows Explorer.
-
- [x] Determine which physical drive contains your Windows 11 OS
-
- [x] Create a VMDK (Virtual Machine Disk) file
-
- [x] Create a new VM utilizing the previously created virtual hard disk file
-
- [x] Configure VirtualBox to boot properly from EFI
All required configuration should be completed. Launch the VM and enjoy accessing your Windows 11 almost fictionlessly within Windows 10.
Tags: Hypervisor Virtualization VirtualBox Windows OS